
Orange biscotti mohawks

It’s rare that I post recipes here, but once upon a time while I was still figuring out what I wanted this site to be like, I actually did take tutorial-type pictures and hold onto new recipes I tried in order to share them. (Don’t panic…I won’t bore you with a full-on tutorial.)
This is an example of one of those days. It was another cold day in January 3 years ago, not long after the duck butt ordeal, and I had discovered biscotti. Now it’s not the first time I had ever had it, but it’s the first time I’d made it and known it by a real name. Apparently “those hard, crunchy things you eat with coffee” isn’t what they’re actually called.
So before the girls got home, I hunted down a decent looking recipe, zested and mixed, baked and baked, and then rebaked again, and got the hot chocolate all ready to go….

Oooo, this is from a time before I fell head over heels in love with my Kitchen Aid mixer.

Mixing in the eggs until everything is extra fluffy is always key. Well, or it’s just fun. Whatever.


I have no idea why I had a picture of a lime, by the way. This is strictly an orange biscotti recipe. I’m sure there was something significant back then, but not so much now. Maybe I was excited by it looking more like a golf ball? Or maybe it was a particularly huge one, but I didn’t think to place something next to it for size perspective? Who knows…but hey look, it’s a lime! /random

^ How not to zest an orange, by the way. You shouldn’t see nearly as much white because that means all the white pithy stuff is getting into your food, too. But guess what? I didn’t have a zester at that point and used a knife….so I sliced off thin pieces and then scraped off as much white as I could and chopped away. Go back to the zesty mix picture and you can see that it almost looks diced.
Work with what you’ve got….another life skill from my mom. Wait until I bring out the duct tape. ;)


Those? Those are fingerprints. Like…full on indents of my entire fingers across each log to press them into the right shape. I was hoping you could see them in the final product, but not so much.


^ Not done. This is the point where you cook them until solid and hard, but after you slice them, flip ‘em on their sides and bake until they’re that extra crunchy dip-worthy biscuit people seem to love.


And then coat them in sugary goodness so they taste decent. In this case, I went with chocolate. Lots of chocolate…

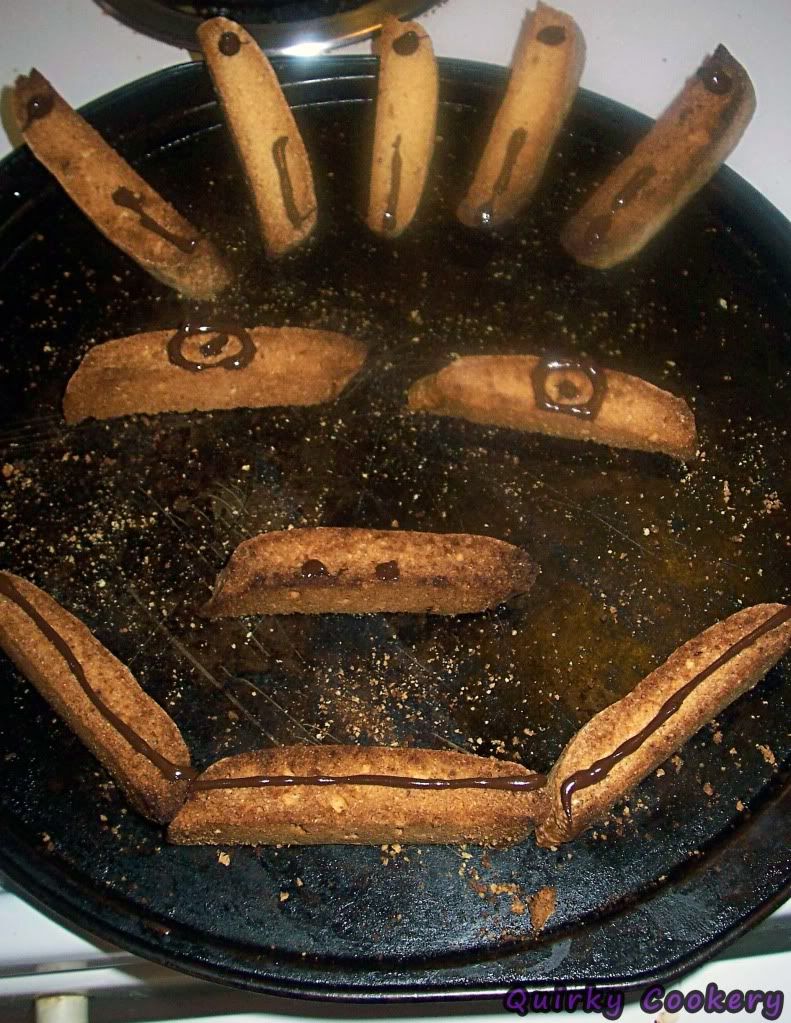

Obligatory funny faces!
Here’s the recipe for you guys who actually follow them to a tee. I didn’t, though, I’m sure, so don’t blame me if yours don’t pop out of the oven all smiley and fun. ;)
Ingredients
- 1 cup all-purpose flour
- 1/2 cup white sugar
- 1/4 teaspoon baking powder
- 1/4 teaspoon baking soda
- 1/4 teaspoon salt
- 1 egg
- 1 egg white
- 1/2 cup chopped almonds
- 2 tablespoons orange zest
- 4 (1 ounce) squares bittersweet chocolate
Directions
- Preheat oven to 350 degrees F (175 degrees C). Grease a cookie sheet.
- In a medium bowl, stir together flour, sugar, baking powder, baking soda, and salt. Beat in the egg and egg white, then mix in almonds and orange zest. Knead dough by hand until mixture forms a smooth ball.
- Roll the dough into a log about 10 inches long; place on the prepared cookie sheet. Press down, or roll with a rolling pin, until log is 6 inches wide.
- Bake for 25 minutes in preheated oven. After baking, cool on a rack. With a serrated knife, cut into 1 inch slices. Place slices, cut side down, back onto the baking sheet.
- Return them to the oven for an additional 20 to 25 minutes; turning over half way through the baking. Melt the chocolate over a double boiler or in the microwave oven. Allow chocolate to cool but not harden before dipping one side of the biscotti into it. Place cookies on wire racks, chocolate side up, until cool and dry.
Chocolate chile cake – Twice the recipes, twice the yum

So I couldn’t make up my mind which chocolate chile recipe to use and ultimately just made two separate cakes that were similar but were from different sources.
Awesome Cake #1 is from Janespice.
Awesome Cake #2 is from Kelsey’s Apple A Day.
Because this is the second…well, third…time I’m writing this post, you’ll be getting mostly pictures:

The main ingredients for both cakes….dried chile/chilli/chili peppers and mini Aero candy bars.


I was shocked by how many seeds were in 4 tiny peppers. The second is what they looked like after I roasted them for a bit.

Mmm, all ground up in a spice/coffee grinder.

Mmm, melting Aero bars. If you’ve never had one before, they’re all airy and full of bubbles in the middle, which is what you’re seeing in the main bar.

The mess from after making the first cake. I rinsed and repeated all over again while it was in the oven.


The second recipe called for ground up almonds. I don’t have a blender and the food processor was dirty, so I just went back to the spice grinder. Take note in the first picture that I didn’t clean it after grinding the peppers…only dumped out the pepper and went at it, which left my almond flour with a nice, peppery heat.


Mmm, egg whites. They’re not quite as peaky as I’d like, but it still worked.

Mess #2….looks about the same, huh? But you can tell they’re different because the batter colors are different.


The first cake is definitely more chocolatey, but you can tell the second was fluffier with the egg whites.


Cake #2 didn’t call for more chocolate, but you know….more chocolate was needed anyway.


I didn’t mix them in but just added them to the top before tossing it in the oven.


1. First cake in the pan. 2. First cake after I flipped t onto a cutting board while still warm. What? I needed the pan. :P 3. Third cake. Clicky if you want them bigger, but they’re nothing special.

I wanted to make a ginger icing to balance out the heat of the chile peppers, but honestly, neither one was very good, so I’m not even going to recommend either. It was a great idea, but not very good in the execution department.
Chocolate chile cake from Jane Spice
1 cup or 7oz. best quality cooking chocolate, I used 72% unsweetened chocolate (I obviously didn’t stick with this one, considering the quality of Aero chocolate, ha)
6 ⅓ tablespoons unsalted butter, softened (4 TB butter, 2 TB oil, because I was running short and had another cake to make still!)
2 tablespoons all purpose flour
½ teaspoon chili powder (Give or take…I tasted the batter and added more…also used fresh powder)
1 cup super fine sugar (Regular sugar here!)
3 eggs, separatedClicky her link for the baking instructions. I cooked mine an extra 5 minutes or so, and got a nice crispy edge.
Chocolate chile cake from Kelsey
I halved this recipe to make it about equal to the first2 TBSP ancho chile powder, divided
1 tablet (3 oz.) Mexican chocolate, coarsely chopped OR
3 oz. bittersweet chocolate plus 1 tsp. ground cinnamon (used Aero….so not quality, but worked)
1 c. blanched almonds, toasted
1/3 c. all-purpose flour
1/4 c. Dutch process cocoa powder
1/2 c. unsalted butter, at room temperature
1 c. granulated sugar, divided
6 large eggs, separated, at room temperature
1 TBSP Kahlua or creme de cacao (used Kahlua)
1/4 tsp. pure almond extract (skipped this)
pinch saltVisit the link for the directions. Again, I ended up baking mine a bit longer, but that’s likely because I added chocolate bars to the mix.

80s cartoon creations – Smurfs, Scooby, Care Bears, Jetsons

Nablopomo – Favorite animated character
Yay, time for some cartoon fun. I don’t have a favorite, but here are some other people’s creations related to some cartoons I would’ve watched in mostly the 80s. (The picture above is mostly 90s toons that my sister would’ve watched instead, but I thought it was a cool collection of cupcakes).


Bugs Bunny Sandwich – Did you know they brought Bugs back?? In 2011, they have a new show called The Looney Tunes Show where Bugs and Daffy are living together in LA and all their neighbors are other toons from the original shows from long ago. I haven’t brought myself to actually watch it yet.


Care Bears Bento – Bento boxes still amaze me


Flintstones Googly Vitamins – The whole site is filled with things with googly eyes.


Muppet Babies Cakes

Jetsons-style Electrolux Moleculaire food printer – Here’s a video explaining how it works, but doesn’t it remind you of the Jetsons?


Recent Comments